Newer
Older

# iMSTK - Contributing

* [Forking workflow](#forking-workflow)
* [Coding guidelines](#coding-guidelines)
 * [Coding style](#coding-style)
 * [Documenting your code](#documenting-your-code)
 * [Testing your code](#testing-your-code)
* [Commit guidelines](#commit-guidelines)
 * [Commit 101](#commit-101)
 * [Commit messages](#commit-messages)
 * [Editing previous commits](#editing-previous-commits)
  * [Amending changes to last commit](#amending-changes-to-last-commit)
  * [Removing previous commit changes](#removing-previous-commit-changes)
  * [Editing older commits](#editing-older-commits)
  * [Syncing repositories](#syncing-repositories)

* [Data Management](#data-management)
 * [Add Data](#add-data)
 * [Fetch Data for your examples](#fetch-data-for-your-examples)
 * [Use external data in your examples](#use-external-data-in-your-examples)
 * [Update your Data](#update-your-data)
21
22
23
24
25
26
27
28
29
30
31
32
33
34
35
36
37
38
39
40
41
42
43
44
45
46
47
48
49
50
51
52
53
54
55
56
57
58
59
60
61
62
63
64
65
66
* [Dashboards](#dashboards)


## Forking workflow
------
To contribute your changes to iMSTK, you will need to follow the [Gitlab forking workflow].

1. [Fork] the iMSTK project to your own namespace.

2. Add the forked remote repository to your git source directory.
```sh
git remote add myremote git@gitlab.kitware.com:{mynamespace}/iMSTK.git
```

3. Create a new branch where you will commit your changes, and name it based on the feature or fix you are implementing.
```sh
git checkout -b new-feature
```

4. Implement your changes: follow the [coding guidelines](#coding-guidelines).

5. Commit your changes: follow the [commit guidelines](#commit-guidelines).

5. Push your development branch to your namespace.
```sh
git push myremote new-feature
```

5. [Create a merge request] once your branch is ready for merging, or earlier as [WIP] if this is a long merge request and need other developpers to discuss it.

6. Stay available for the review process: you might need to address some issues and push new changes.

7. Once your changes have been reviewed and the associated builds and tests pass on [iMSTK dashboards](#dashboards), your branch will be merged into `master`.

8. At that point, you can if you desire get rid of your development branch and pull the latest commits from the master branch, then repeat from step 3 for further development
```sh
git branch -d new-feature
git checkout master
git pull origin master
```


## Coding guidelines
------

### Coding style

#### Layout
1. Do not use tabs. Set up your editor to insert spaces. Indentation size should be set to 4.

2. Braces must be used to delimit the scope of an if, for, while, switch or other control structure.
3. Curly braces should go on a seperate line.
```sh
   {
       ...
   }
else
   {
       ...
   }
```
3. Source code in the body of the brackets must be indented
```sh
for (unsigned int i=0; i < 3; i++)
   {
       int z;
       z = i + 4;
   }
```
4. Each line of code should take no more than 200 characters
4. Use lots of whitespace to separate logical blocks of code
5. Declaration of variables within classes, methods, and functions should be one declaration per line
```sh
int i;
int j;
char* stringname;
```
#### Naming convention
1. General
  * Names are constructed by using case change to indicate seperate words. For example TimeStamp
  * Underscores are not used
2. Classes
* Classes are named beginning with a capital letter
  * Classes are placed in the appropriate namespace
3. Class member variables: Class data members are prepended with m as in m_Time.
4. Local variables: Use lowercase
5. Files: The filename should be the same as the class
1. General: When you document your code make sure you use correct English and complete, grammatically correct sentences. Finish your sentences with a period.
2. Documenting a method. Add a brief comment describing your method in your class implementation files.
3. Documenting a class. Classes should be documented using the class and brief Doxygen commands,followed by the detailed class description.

```sh
/** \class SpatialHashTable
\brief Abstract class for spatial hash tables

The SpatialHashtable class implements a 2D data structure that can map keys to values.
...
...
...
**/
```

#### Code style check
You can and should use the `uncrustify` tool to check and/or adjust code style of your files. It is run as part of git's pre-commit hook, as part of test suite invoked by CTest or by building *RUN_TESTS* target in Visual Studio. You can also run it manually by building *uncrustifyRun* target, but in that mode your files will be overwritten so make sure you commit your work beforehand to easily see the style changes automatically made by `uncrustify`.
To temporarily disable style checking as part of a commit hook, run:
```sh
git config uncrustify.skip true
```
Then commit your changes. Then build *uncrustify* target, e.g.:
```sh
make uncrustify
```
You can view the changes by running `git diff`. If the changes are minor, add them to your previous commit, `git commit --amend`. If the changes make the style uglier (it can happen sometimes), the best solution is usually to re-write your original code to avoid the questionable style changes from having to be made. Only rarely should you use \*INDENT-ON\* and \*INDENT-OFF\* keywords in comments to disable uncrustify's style check for a portion of the code. Once everything is sorted out, enable uncrustify:
```sh
git config uncrustify.skip false
```
152
153
154
155
156
157
158
159
160
161
162
163
164
165
166
167
168
169
170
171
172
173
174
175
176
177
178
179
180
181
182
183
184
185
186
187
188
189
190
191
192
193
194
195
196
197
198
199
200
201
202
203
204
205
206
207
208
209
210
211
212
213
214
215
216
217
218
219
220
221
222
223
224
225
226
227
228
229
230
231
232
233
234
235
236
237
238
239
240
241
242
243
244
245
246
247
248
249
250
251
252
253
254
255
256
257
258
259
260
261
262
263
264
265
266
267
268
269
270
271
272
273
274
275
276
277
278
279
280
281
282
283
284
285
286
287
288
289
290
291
292
293
294
295
296
297
298
299
300
301
302
303
304
305
306
307
308
309
310
311
312
313
314
315
316
317
318
319
320
321
322
323
324
325
326
327
328
329
330
331
332
333
334
335
336
337
338
339
340
341
342
343
344
345
346
347
348
349
350
351
352
353
354
355
356
357
358
359
### Testing your code
*Coming soon - Please refer to the rest of the code in the meantime*


## Commit guidelines
------

### Commit 101

1. **Commit often**

    You do not need to have a lot of changes to create a commit. On the contrary, you should try to split your changes into small logical steps and commit each of them. They should be consistent, self-contained (work independently of later commits), and pass the same test which previously did (or more) to ensure you do not introduce any regression. On the other hand, do not push it to the extreme: if your changes are tightly related and stay clear as a whole, there is no need to create multiple commits, even if they are applied to different files, methods, etc.
    >TIP: `git gui` will allow you to stage changes by lines or by hunk instead of the whole file. It is extremely useful when your recent changes could be divided in multiple commits.

2. **Style only rhymes with style**

    Style changes can introduce a big number of diffs in your whole project (take a variable name change, tabulation in a whole file...). If commited as part of a commit for enhancement or bug fixes, it becomes very difficult for a reviewer to track down the changes specific to your work, and the ones specific to style changes. For that reason, prefer grouping style changes in a separate commit.

3. **Push often**

    The first main reason to push often is to have your work somewhere else than just on your computer if something happens to your source code or your machine. Another reason is to facilitate code sharing: even if your branch is not at maturity, creating a pull request as [WIP] will allow you to discuss your progress, ask questions, and get feedbacks during the development process and not just at the end.

4. **Merge to master often...**

    The whole idea behind continuous integration (or CI) is to integrate your own code with the main repository as often as you can. If you make small changes and put them into single commits you may integrate them often (and probably should). Doing so minimizes merge conflicts with your team members. You can read more about CI in a Git context in Martin Fowler’s excellent [FeatureBranch article].

5. **... but never the other way around!**

    If your branch and the master branch diverge and are in conflicts, never resolve those by merging master into your branch. Instead, rebase your branch against master. This will allow you to adress the conflicts where they were introduced instead of commiting a patch complicated to review, and will keep the commit history clean.

Some of the content above was directly or partially taken from Crealytics blog : [5 reasons for keeping your git commits small](https://crealytics.com/blog/2010/07/09/5-reasons-keeping-git-commits-small/).

### Commit messages

Proper commit messages are important as they allow to speed up the review process. They are also crucial for development down the road to be able to come back to that commit and understand the logic behind the changes.

1. Describe thoroughly

    Assume the reviewers do not know your motivation behind your work: every change you make has a reason you need to explicitly write down in the commit description, even the little things (ex: why changing a default value). This will accelerate the review process by allowing reviewers to rely on your work description instead of having to contact you for answers.

2. Document accordingly

    A great addition is to offer links to additional information like your source (reference to the algorithm you are using, online discussion supporting your changes...), hash of the commit that introduced the regression being fixed, etc.

3. Be specific

    When making changes to multiple classes or refering to other classes than the one being modified, be specific about class methods and members by properly specifying the namespace: `Class:method()` or `Class::m_member`.

4. List changes

    If your commit is composed of multiple changes in order to stay self-contained, list your changes instead of appending them in long paragraphs for clarity.

5. Use a clear and short commit title

    Describe the topic in a couple words while being as specific as possible. "Improve rendering" or "Fix controllers" would be considered too broad.

6. Use the appropriate title prefix
  * **ENH:** For enhancement, new features, etc.
  * **PERF:** For improved performance, optimisations.
  * **BUG:** For runtime error fix.
  * **COMP:** For compilation error fix.
  * **TEST:** For new or improved testing.
  * **DOC:** For documentation improvements.
  * **STYLE:** For changes which do not impact the way the code is executed nor the user experience.

### Editing previous commits

While implementing your topic that would be holding multiple commits, you might end up making changes which should be coupled with or which revert changes from previous commits. The same thing can happen when your merge request has been reviewed and you need to make changes that should be applied in existing commit.

It is possible to change previous commits in order to keep your topic clean and make the reviewing process easier, a couple options are listed below.

This process consists of rewriting the branch history, therefore re-syncing it with other remote and local repositories will be necessary ([see below](#syncing-repositories)).

* **Amending changes to last commit**

    All you have to do is stage the extra changes like you would for a normal commit, then commit with the --amend argument.
    ```
    git commit --amend
    ```
    > TIP: You can also use `git gui` and click on the amend commit radio button.*

* **Removing previous commit changes**

    To go to your previous commit and make changes, you can use reset:
    ```
    git reset HEAD~
    ```
    This will undo your commit, but keep your changes as unstaged. Once your have made your changes, you can then create a new commit:
    ```
    git commit -m "message"
    ```
    >TIP:
    >* You can also use `git gui` and click on the amend commit radio button, then unstage or remove changes from the previous commit.
    >* To keep the changes staged, you can use the `--soft` flag. If you want to get rid of the commit changes alltogether, you can use the `--force`.
    >* To reset more than one commit, you can call `git reset HEAD~X` with X the number of commits to reset. Works with the flags referenced above.

* **Editing older commits**

    If you need to change commits that precede your last commit, you can use the interactive rebase tool.

    First, run git log to see how much back you need to go from your current state:
    ```
    git log --pretty=oneline
    ```
    If you want to make changes up to 3 commits back, you would then call:
    ```
    git rebase -i HEAD~3
    ```
    Running this command gives you a list of commits in your text editor that looks like this *(note that the order is inversed from git log, the more recent commits being at the bottom of the list)*:
    ```
    pick ecd29d0 ENH: Add custom event handlers for vtk interaction
    pick 529ca92 COMP: Fix function is not a member of std (Win)
    pick 8d0bc67 COMP: Fix return error in MeshIO::write
    ```
    From here, you can do multiple things:
    * Rearrange the order of commits by swapping the lines (in vim: `d+d` to copy, `p` to paste)
    * Delete a commit by removing the commit line
    * Replace the `pick` command (which does nothing) by other commands, like:
      * `r` or `reword` to edit the commit message
      * `e` or `edit` to stop for amending
      * `s` or `squash` to meld into previous commit (line above) and stop to edit the commit message
      * `f` or `fixup` to meld into previous commit (line above) and ignore that commit message
      * `d` or `drop` to remove the commit (same as removing the line

    When you save and exit the editor, Git rewinds you back to the last commit in that list and starts running the commands per commit, from the oldest commit to the more recent. If you stop at a commit to amend it with `edit`, follow the [instructions above to amend/edit the latest commit](#amend-changes-to-last-commit) (you can even create multiple commits). Once you are ready, continue the rebase with the command:

    ```
    git rebase --continue
    ```

    * ***How do I amend some code I already wrote to a previous comment?***

        You have two possibilities:
        * If you have already commited that new code, you can place its line under the commit to amend in the interactive rebase, and change its command to `s` or `f` if you want to edit the initial commit message or not.
        * If you haven't commited your changes, you can either commit them and follow the instructions above, or stash them:

            ```
            git stash
            ```

            Then run the interactive rebase with `e` on the commit to amend. Once you stop at that commit, you can pop the changes from the stash, commit them, then continue:

            ```
            git stash pop
            git add .
            git commit --amend
            git rebase --continue
            ```

    * ***I have conflicts when rebasing or calling stash pop, what do I do?***

        When you try to amend changes to a previous commit, it is necessary that no changes were made to that same chunk of code in between to avoid conflicts. If you end up having conflicts, there are two solutions:
        * Try fixing the conflicts by hand: if you have made small and concise commits, the conflicts should be easy to tackle. `git status` or `git gui` will show your were the conflicts are. You can use tools like the ones listed [here](https://developer.atlassian.com/blog/2015/12/tips-tools-to-solve-git-conflicts/) to help you resolve those.

            Once you have resolved the conflicts, stage the final changes and continue the rebase. MAKE SURE NOT TO COMMIT!

            ```
            git add .
            git rebase --continue
            ```

        * If the conflicts are too complex to solve, you can abort the rebase at any time:

            ```
            git rebase --abort
            ```

            At that point, you can rethink your amending strategy based on the conflicts you discovered, and divide your recent changes in multiple commits to squash properly in a new interactive rebase attempt.

    * ***I messed up the rebase really bad without aborting, what do I do?***

        * ONLY if everything you need is on your remote (you did not lose anything locally which would not be on the web), the easiest way is to do sync up from your remote repository:

            ```
            git fetch myremote
            git reset --hard myremote/branch-name
            ```

        * If not, reflog is a mechanism which records when the tip of branches are updated. It can be used to revert/access changes still in Git's storage.

            ```
            git reflog --all
            ```

            What this shows is a list of commits that Git still has in its storage. The first 7 characters are the beginning of the commit’s SHA1 hash, followed by the commit’s pointer, action, and message. You can see that not just commits are listed: switching branches, merges, rebases, and more are shown. The important part is the commit pointer and the SHA1: once you have that, you can do a `git show` to see the diff, or perhaps a `checkout`, `cherry-pick`, or `merge` depending on how you want to get the change back into your history. - Read the full article on [gitready.com] for more information.

            > TIP: You can also use the `--all` option to get more detailed information about different branches and even the stash


* **Syncing repositories**

    If your code was never pushed before being changed then you don't have to worry about it, but if you push often (which you should be doing), then the history of your branch on your remote will be different than the one you changed locally.
    Pushing to your remote will not work for that reason, you will need to do a push force. Before you do this, make sure that:
    * you did not forget anything locally as the remote history will be ignored and replaced by your local one
    * noone else pulled your code from your remote repository and is using it for another reason that merge request testing

    The command to push for to your remote repository is:
    ```
    git push myremote feature-branch -f
    ```

    If you or someone else pulled your branch to test the merge-request on another computer, you won't be able to pull from the remote repository since the difference in history will start a merge. Instead, you can resync the local branch based on the remote branch this way:
    ```
    git fetch myremote
    git reset --hard myremote/branch-name
    ```
360
361
362
363
364
365
366
367
368
369
370
371
372
373
374
375
376
377
378
379
380
381
382
383
384
385
386
387
388
389
390
391
## Data Management
------
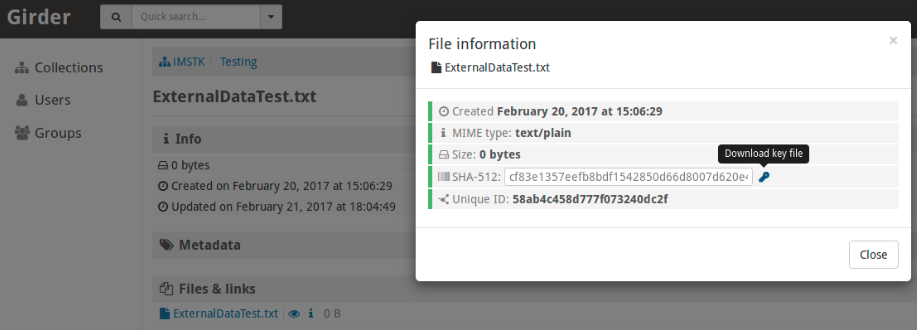
* ### Add Data
The proper way to add data to iMSTK, is to:
- Contact a project manager to upload your data in the [Girder iMSTK collection](https://data.kitware.com/#collection/58ab34918d777f073240dc02).
- Add the key file to `iMSTK-Source/Data` (Download the key file from girder as shown on the following picture).
* ### Fetch Data for your examples
To fetch the external data before building your example, you will need to list it using `imstk_add_data` in your example CMakeLists.txt:
```cmake
imstk_add_data(exampleExecutableName dataList)
```
> * `exampleExecutableName` is usually `${PROJECT_NAME}` in an example CMakeLists.txt.
> * `dataList` need to contain the list of data names which are needed in the example. Those names are relative to `iMSTK-Source/Data`.
> * Regular expressions can be used to populate the file list using [REGEX](https://cmake.org/cmake/help/v3.8/module/ExternalData.html#referencing-associated-files).
The data will be downloaded from Girder to `iMSTK-build/Innerbuild/ExternalData/Data`: the `Objects` directory is the datastore, and the `Data` directory holds symbolic links to that data with expected file names.
* ### Use external data in your examples
The path to the data directory is defined by iMSTK_DATA_ROOT which can be used in your C++ code as shown below :
```c++
imstk::MeshIO::read(iMSTK_DATA_ROOT"/relative/path/to/mesh.vtk");
```
* ### Update your Data
- Contact a project manager to update your data in the [Girder iMSTK collection](https://data.kitware.com/#collection/58ab34918d777f073240dc02).
- Update the key file to `iMSTK-Source/Data` as described in the [Add Data section](#add-data).
## Dashboards
------

Dashboards - powered by [CDash] - helps visualizing the latest state of iMSTK builds on Windows, MacOSx, and Linux, to avoid introducing regressions when offering changes to the toolkit:
>http://open.cdash.org/index.php?project=iMSTK
**Name** | CDash Build Group Description
--- | ---
**Nightly** | Builds running every night
**Continuous** | Builds running every time there is a change to the master branch
**Experimental** | Builds running after calling `@buildbot test` in the comment section of a Merge Request

---
[Gitlab forking workflow]: <https://docs.gitlab.com/ce/workflow/forking_workflow.html>
[Fork]: <https://docs.gitlab.com/ce/workflow/forking_workflow.html#creating-a-fork>
[Create a merge request]: <https://docs.gitlab.com/ce/workflow/forking_workflow.html#merging-upstream>
[WIP]: <https://docs.gitlab.com/ee/user/project/merge_requests/work_in_progress_merge_requests.html>
[FeatureBranch article]: <https://martinfowler.com/bliki/FeatureBranch.html>
[gitready.com]: <http://gitready.com/advanced/2009/01/17/restoring-lost-commits.html>
[CDash]: <http://www.cdash.org/>